In this rather lengthy post I’m going to talk about the soundtrack I made for the new Amiga 500 demo – Eon by The Black Lotus. I’ll be covering everything from the early beginnings and creative decisions through to the tech that was built to enable us to break out of the memory restrictions of the platform.
the beginning
So it all started around 4-5 years ago when I visited the TRSAC demoparty in Denmark. My good friend Booster sat me next to Emoon / TBL. We started chatting about demos, Amiga stuff and he mentioned he would like to work with me on a production. Anybody in the demoscene will know that TBL are tour de force in terms of the quality of their productions so I was very interested to see where this would go. At the time I had no idea what the target platform was so it was a really nice surprise to find out they we’re targeting the original Amiga 500, a platform very close to my heart.
the platform
The Amiga 500 runs a Motorola 68000 CPU at 7mhz, a 3.5″ single density disk drive and 512kb of what is known as Chip RAM. That means the custom chips (graphics and sound) in the system have direct memory access (DMA), so they can do things concurrently while the CPU is processing other tasks. The common config of the system includes an additional 512kb RAM expansion, however there is a catch, the custom chips cannot access that RAM. This obviously provides some real challenges which we’ll dig into later.
I won’t delve into the Amigas graphics hardware here as it’s well off topic, but the sound chip was a real marvel when it first arrived 1985. It is capable of playing 4 channels (or voices) of PCM audio (samples). Each channel can play 8-bit samples up to 28khz with 64 different volume positions. All of this is controlled by the Paula Chip and DMA so the CPU only needs to do a little setup to kick off sample playback.
protracker and some history
In terms of music format, there is really only one choice.. ProTracker. There are other options on the platform but it is the most common within the demoscene and actually one of the most popular music formats of all time (outside of Tape, CD etc.). As it stands, the replay code is terribly slow and badly written, so the best option is something called The Player 6.1. It converts the song data into a much smaller format which also plays in real-time, with much less CPU usage.
To say I’m familiar with ProTracker is an understatement. During my teens I wrote a huge amount of modules within the demoscene which you can find archived here. Back then I was solely a musician and not a coder, until I came back to the demoscene in 2010. I entered a tracked music competition at Sundown demoparty and got a real bug for it again. All of old my tunes were lost when I parted ways with my old Amiga, so it was a lovely surprise to find them in the archive linked above. I discovered a set of jungle tunes I wrote back in the 90’s with the intention of making into a continuous running music disk, so decided to start learning assembler and the Amiga hardware to finally bring it to life. A year later I finally finished 8-Bit Jungle and during that time I learned the replay code and music format inside out.
From there I spent a lot of time entering music competitions and trying to stretch the sound capabilities of the format and applying more modern styles of music to it. In 2015 I finally decided to “learn” some “DSP” coding techniques. Those are in quotes because my first attempts were not the correct way to learn this stuff. But, with experimentation and persistence I managed to create Generator, a 32kb Amiga executable tune which generates an 800kb module. Not in real-time as the CPU is way too slow, but at run-time during playback. Luckily these early experiments had some use further down the line for this demo. There is a more detailed write-up on how this tune works in the link above.
back to the project and picking a vibe
When making music for a demoscene production, it’s really important to get the mood and atmosphere right. At this point we are still at the very early stages of development, so virtually no physical content exists. The team gathered a selection of images and videos which helped describe the project’s vision. My first task was to soak these up and find some pieces of music from other artists which might be fitting. After some back and forth with the team I managed to find something that provided me with a direction to go in.
early work stages and idea
My method for making ProTracker music has drastically changed from when I was younger. Back then you didn’t have the internet or huge sample packs to to dig through, instead you found samples in little sections of other peoples music or just stole samples from other peoples modules.
These days I now work primarily with a DAW (digital audio workstation) currently Ableton, so it’s really the natural place to start for something like this too. I have a selection of VST plugins and a multitude of sample packs, although that doesn’t stop me from going off on hunts for new sounds, downloaded or handmade. The big benefit here is that you can very quickly sketch out ideas. It’s also handy during the rest of the production process as you can keep dropping in and adding to it.
After an evening or two of sketching, while taking in the vibe of the reference material, I ended up with this little loop.
As you can hear, the beat is pretty much all there right from the off, but that is something I focus on at the beginning of most projects. I passed it over to the TBL team for some quick feedback to find I’d gone far too dark. At this point we have nothing in ProTracker as it makes no sense to spend the time converting samples and editing stuff if you might to throw it away.
A couple of nights back in the studio and a slight change of direction resulted in this following sketch.
This one seemed to hit the nail on the head, which is pretty good going as sometimes you can run through a raft of sketches before something really clicks. The track goes back and forth a few more times so I can test a few extra layers with theam, before I start to think about a strategy for porting it to the Amiga.
time to start tracking… is it?
You usually have to think a little ahead when making music for ProTracker because it has limitations. It can only store a total of 31 samples and each sample can only be 64kb in total size, which itself is a strange limitation when the Amiga can play up to 128kb in one go. Also you have to consider where the music is going to be used. A Revision tracked music entry has a limit of 2mb which is incredibly hard to reach and you are most likely to run out of sample slots before size (you can learn about beating that restriction here).
In our case we’re running on an original Amiga 500 with 512kb of Chip RAM, but that has to be shared between audio and graphics. Emoon generously allocated 200kb for sample data right from the start (typically this can be around 120kb to 150kb for other Amiga demos).
A good thing to do at this point is to bounce (export) some of the layers out of the DAW and convert them to 8-bit PCM. This will give you a good idea of how much space you are taking up. I did a quick conversion of all the elements in the previous sketch above and even using some conservative samples rates and I’d already broken the 200kb size limit. To have the drums at the quality I wanted it would take about 35kb per bar (4 beats). All of that would eat disk space and RAM very quickly.
here come the drums
Back in the old days I used a tool on the Amiga called MOD2SMP. It allowed you to load any ProTracker module and then render a section of it into a single sample. At the time it was a game changer. It effectively turns a single channel into a static collection of four, at the cost of the sample data. For example one loop could cost you more than your entire drum kit, so it can be expensive and wasteful.
While working on Generator I wrote a routine which works in a very similar way to MOD2SMP. Provide it a bank of samples and a 4 channel pattern of data and it can render that sequence to a single sample. The only difference with this system is that all the samples are played at the same pitch for performance reasons. If you don’t have to change the pitch of a sound, mixing them together requires far fewer instructions. The overall benefit here is that I can have as many different variations of those drums loops as I want. The footprint is all the individual drum sounds and a handful of bytes for each variation. However, you still need to render the loop into RAM to be able play it.

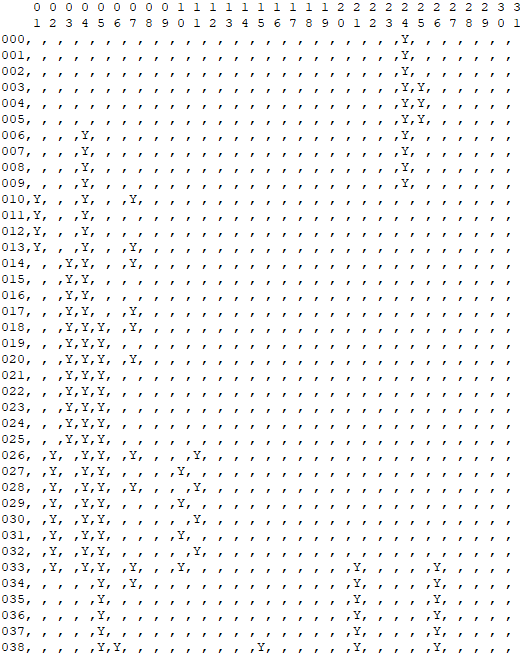
A quick explanation of the data above. the fr column is the number of frames (the speed setting of a line in ProTracker) and each channel is sample number followed by volume.
Speaking with Emoon we decided to see if we could make this work for the demo, but hit upon a problem. The loops are not stored on disk but they still need to be in RAM. If we create 5 or more drum loops the entire budget is blown already. However, in terms of music we tend to use only one loop at any given time, although the switch between them has to be instant. To solve this we add a further restriction.
Every loop has to be the same length – then we can double buffer them.
While playing the loop in buffer A, we render the next loop to buffer B. When the music progresses and starts playing the loop in buffer B, we can safely render the next loop into buffer A. Switch and repeat. Now we are only paying for two loops to be in RAM at any given time.
The other added benefit is that the individual drum sounds don’t even need to be in Chip RAM. They aren’t played from there so the DMA doesn’t need to access them. They are only processed and mixed together with the CPU. Great, more savings.
life is simpler with tooling
There were two more problems to solve before we could confidently move on. The current method of writing new drum loops was horrific. Using just a text editor with a bunch of numbers was really going to hamper even the smallest of changes. Also, the loop data in the code had no link to the sample slot they occupy within the main module.
The concept then became two modules. One main module for the actual music and another module which only contained the drum loops. This way they don’t interfere with each other.
To resolve this, in the main module we used a basic naming scheme to describe the section of the drum module you want to render.
POSAA_BB_CC
AA = Song position
BB = Pattern position
CC = Length
Now with the tool we can evaluate both modules and automate the entire process.
- scan the main module for any sample named POS
- using the parameters stored in the name, convert each pattern section to data
- export all used drum samples to a single sample bank
- using the sample data from the drums, render the physical drum loops so they can be loaded back into the main module
Any changes or new loops can be easily done in ProTracker and the process for getting them back into the main module is super simple. It also generatres everything we need for the demo.
In the end we used around 70kb of drum sounds and 6 loops. If we had used the loops as is, it would have cost us 228kb of Chip RAM and disk space. Below is a video of the drum module, including a free bonus loop which was never used.
What a result! Near endless drum loops at hardly any cost and we are essentially running 7 channels!
sample streaming
The next problem to solve was the rest of the samples. We had already spent 96kb of the sample memory on two loop buffers (decided on 1.5 bars per loop for extra possibilities). This only left us with 104kb for all of the musical elements. That wasn’t going to be enough for what we we’re planning so Emoon started designing a sample streaming system.
With music, you generally don’t have all your elements playing at once. You would layer them up over time, adding diversity, peaks and troughs. For example some sounds might only appear in the intro, others may only appear in the last minute.
In order to leverage this principal, the first thing we need to know is the running order – which sample is played when. Using the tooling I’d already started, I added a function which would scan every pattern of the main module and output a CSV telling us which samples appear on which pattern, giving us an overall timeline.
Above, sample 24 is the hum sound in the intro and sample 25 is the cell phone ring. As you can see they are only used until pattern 9 and never occur again.
Using this information Emoon now knows where every sample starts and ends. This information can then be imported into the main timeline with the demo elements, so everything can be seen along side each other.

Now with this data you can make some assumptions which cover a large number of cases.
- Load or render a sample x patterns before it plays
- Remove a sample y patterns after it has played for the last time
Using this principal we can calculate if we will run out of memory before even playing the demo.

BIG is where the two drum loop buffers live
SMALL is where all the other samples are streamed
This works really well off-line. However, as we discovered later on, things start to get tricky when the demo is running.
shrinkage
Data compression is pretty important, especially when we are running from two floppy disks. The rest of the demo uses LZ4 to squash things down smaller, but on sample data this is really ineffective. The drum kit uses a basic delta to keep the quality as high as possible but for the rest, we needed something better.
The Player 6.1 has a built in 4-bit delta mode which reduces the size by 50% at the cost some quality. However, the team had an ADPCM compression system to hand. It had nearly the same compression ratio but a slightly better quality of output. The algorithm is actually designed for 16-bit samples but still works well in 8-bit.
So in total we now have 3 options available, uncompressed, 4-bit delta and ADPCM. Emoon put these together in a small tool which would allow us to import the module and test these methods against each sample. It also exports the options to a file he can then import into the demo system, stating which compression method is used for each sample.

While we had these options available, we ended up just using the ADPCM compression for all samples.
tweaks and juggling
As the demo enters the last month of production, things really start to ramp up a gear. The final scenes and running order are starting to take shape and changes to the soundtrack are coming in.
Some design decisions were made to cut out sections out of the demo. They were intended as filler parts, simple scenes or effects which grant you a bit more breathing space. Thankfully it was a great choice as it made the demo so much better. However, the added load meant things in the music started to get a little shaky.
Firstly, samples which were already playing appeared to be getting overwritten, resulting in some horrid sound. Quickly we discovered that in some use cases, looped samples were being triggered on one pattern, but left to fade out over a series of subsequent patterns. As there is no trigger on the pattern, the system thinks it’s good to remove. We beat this by adding the sample number into the subsequent patterns, so the system knows it’s still playing. If you open up the module in ProTracker, you’ll see the hum noise in the intro being triggered with a sample number and the current volume, declaring it’s still present, to our system.
The last issue was slightly more complicated. In some cases a sample failed to load in time as the parts of the demo we’re loading closer together, taking up valuable processing time. However the same technique can be applied here. Silently trigger the sample in question a pattern or two earlier and it will be ready in time.
By this point any changes to the soundtrack would usually result in something breaking. On the whole, the system was working but we needed to juggle the trigger points here and there.
I wasn’t able to build and test the demo but Emoon could. So, to clean these up he adjusted the tune map CSV file to make sure things were loading early enough. Once confirmed as working, I then used the adjusted file to make the same changes in the module. The next time I then generate an export from the tool, it matches and we don’t lose those changes.
the dance scene
The highlight of the demo – the big scene. Well this one was tricky to get right. Still having the component parts of the tune in the DAW meant I could try a bunch of different ideas without wasting time converting stuff into ProTracker. After a few iterations I hit on something which worked really well with the scene.
Once that was decided we now had to try and get that ported into ProTracker. By this point disk space and RAM is really tight and I had to try and fit five new chord stabs into a tiny little space. I picked a pretty conservative sample rate which thankfully managed to fit on the disk, but as soon as we ran the off-line memory checker.. this happened.

I noticed something in that list. The PIANOLOOPED.8SVX and BASS.8SVX are the only two samples which are used almost throughout the entire music, start to end. However we had a gap of 3436 bytes between them. If we closed that gap, we should eliviate the memory fragmentation just enough to squeeze in that last sample.
Rather than doing a nasty hack, we got away with just silently triggering both of those samples at the very begining. It forced the memory allocator to push them next to each other freeing up just enough space to squeeze in the last sample.
the timestretch effect
OK, last thing then and I’ll let you get on… In ProTracker, there is a sample offset command (9). It allows you to trigger a sample at different points. The value can be 0-255 ($00-$ff) and is multiplied by $100, so if you set a value $28 it will play from position $2800. The issue here is that $100 bytes of sample data is actually quite a lot so you can land slightly off and play out of time.
When implementing the drum loop system I realised I needed to maximise the usage of the samples using the offset. The tune was at 130 BPM and I was rendering the loops at D#3, but it didn’t match well to the $100 offset and played out of time. I experimented a little with the BPM and sample rate until I hit the perfect point, 129 BPM and C#3. The result was that I could access every 1/16 using a sensible incremental value of $08. This is makes is much easier to key into ProTracker, $00, $08, $10, $18, $20 and so on. I now have access to trigger every point within the loop.
Coming into the closing stages of the production I remembered a trick I used a few times in the past. You fill the pattern with different notes (1/32) and the 9 command, but incrementing the correct value on each line. This keeps the loop in time but able to be play it at a different pitch. You can even play the loop at half speed by halfing the increment used each line. While I have done this trick before, the positions have never been this accurate which makes it sound really tight.
While this trick is only used in a few places, it really helped with the transition into the last section of the music.

and we are done
So there you have it. That is how you fit a 550kb ProTracker module into an Amiga 500 OCS demo. If you thought this was a lot of tech and work just on the music, you should see all the tools and code the team built for the rest of the demo. It truly is phenomenal.
You can download the ProTracker module here but if you want to be lazy, just play this capture that Slash kindly did for us.

Wauw … just …….. WAUW!
As a tool-creator myself I really can appreciate the beauty and effort that went into this.
Utterly amazing.
LikeLike
This is awesome, instead of forcing you to cut the samples to solve the problem, N new problems were created to finally solve them all! Stunning.
LikeLike
Awesome explanation, and also fantastic workout of the problems. Your work deserves all recognition and quality. My most sincere congratulations, you have created an awesome demo that will be remembered forever. Thanks.
LikeLike
H0ffman, many thanks for this write-up. It helped me better appreciate the sophistication that went into Eon, and it gives me ideas how to replicate some of this magic on a lesser platform.
LikeLike
Mind = blown ❤
LikeLike
This is EPIC bro! Totaly mindblow article! Thank you!
LikeLike
This is EPIC bro! Totaly mindblow article! Thank you!
LikeLike
Hoffman, you’re a legend! Maximum respect for this awesome tune and Eon is a timeless piece of art. GREAT GREAT WORK and thanks for sharing this writeup!
LikeLike
Hoffman, you’re a legend! Maximum respect for this awesome tune and Eon is a timeless piece of art. GREAT GREAT WORK and thanks for sharing this writeup!
LikeLike
Good sounds and electronical melody-vibes too 🙂
LikeLike
Awesome work, thanks for the more detailed behind the scenes, inspiring work and one that pulls me into wanted to be part of the demo scene even more. For the moment will continue developing Amiga games but am starting to put together more demo scene gfx. Keep up the great work and look forward to 2020 🙂
LikeLike
Clap… clap… clap…
LikeLike
simply Awesome! nothing more to say. (Estrayk / Capsule)
LikeLike
Really Awesome!!, nothing more to say. congratulations H0ffman! (Estrayk / Capsule)
LikeLike
Awesome music, awesome article, thanks dude!
LikeLike
What a great era to be alive.
Thank you.
LikeLike
This is great stuff, really loving some of the things you’ve been cooking up.
Just one thing: You mentioned the 64 kB limit of samples in ProTracker. Some years ago I made a module for a compo. I wanted to submit it as a mod, but my weapon of choice was OctaMED. So when it was finished I loaded it up in PT to see if everything was alright. As it turns out, I had a couple of long drumloop samples, I believe the longest one was around 120 kB.
It did load up and play perfectly fine in PT, but the size of the samples (and, I believe, the total size of the module) was incorrectly reported by PT. But it sounded exactly like it was supposed to. I don’t know how something like The Player would handle this module, but I have had no problems with this module in any of the programs I tested it in.
I also believe I read somewhere that the limit of the Amiga sound chip was actually 128 kB *per loop point*. So in theory you could have a single 256 kB sample if you trigger a loop around the 128 kB mark. Never tested this in OctaMED though.
LikeLike
Such an interesting read, and gives one a renewed appreciation for the whole process. There are so many hurdles to overcome in a 4ch MOD. Number of concurrent sounds, whether it’ll fit in memory alongside a demo, etc. Seems like you guys went above and beyond to mitigate these problems. First class.
LikeLike